
By Laith Stevens – I was thrilled recently when asked by Panasonic LUMIX Australia to write a blog post focusing on light painting (Live View Composite) photography, an area of photography that is not widely understood, but an area I have been really interested in for the last 12 months or so. I enjoy passing on my knowledge and experiences with my much-loved Panasonic LUMIX S5 and now the S5II Cameras and LUMIX S Series Lenses, and hope that in some way, it can benefit or maybe inspire others to get their gear out and capture some images.
As with most photographers, over the last few years it has been difficult to get out and shoot the landscapes that I usually capture, and the lack of ability to travel has meant that the areas that were accessible to me felt a bit stale, and over done! At least that is what it felt like to me!
So, what do photographers do when they are forced to go into lock down? Well, I spent a great deal of time on YouTube, trying to find ways to rediscover and reinvigorate the areas I had access to, spaces I had shot many times, and I came across a topic that I had only tried in a very limited way previously, light painting! I was amazed by what I was seeing and the beauty of what could be created with quite simple equipment and techniques, and with that I decided I would have a more serious crack at it.
The great thing with light painting is that all you need is a camera capable of long exposure photography, and as we know, our Panasonic LUMIX S5 and S5II cameras have the Live View Composite mode that is be made for light painting, a light emitting device or a brush to paint with if you like, and a tripod or other device such as a bean bag to hold your camera steady, and with those three things, you can create magical images where the possibilities are limited only by your imagination!
As with most things, there are purpose-built tools available for light painting photography that can be purchased off the shelf. I was amazed at the shear amount of gear available to be honest and after my research, I decided to purchase some fantastic gear from Jason Page and his team of wonderful people at “Light Painting Brushes“. I should also add, I loved their gear so much, I reached out and asked them to send me some additional light painting tools to help me make more fantastic images for this story and thankfully, they obliged! Thanks guys!
However, if for whatever reason, you are unable to purchase ready-made tools for your light painting, don’t despair, as you probably already have a great many things that can be used to make fantastic images just laying around the house, from tin foil to perhaps an old soft drink bottle. So, I challenge you! Go have a look and see what you can find, you will be amazed!
Basic Equipment
Flashlights: There are endless varieties of flashlights out there, some are more capable and better suited to light painting than others, and whilst I don’t want to recommend any one flashlight over another I’ve found these lights to be great and work well for my work:

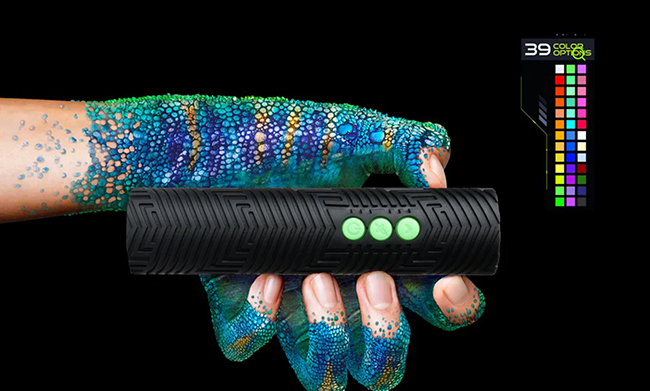
Ants on a Melon Critter 2 – RGB multi coloured and programable flashlight. This is a fantastic solution that can be coupled with modular proprietary light painting tools that are both interesting and compact for travel.
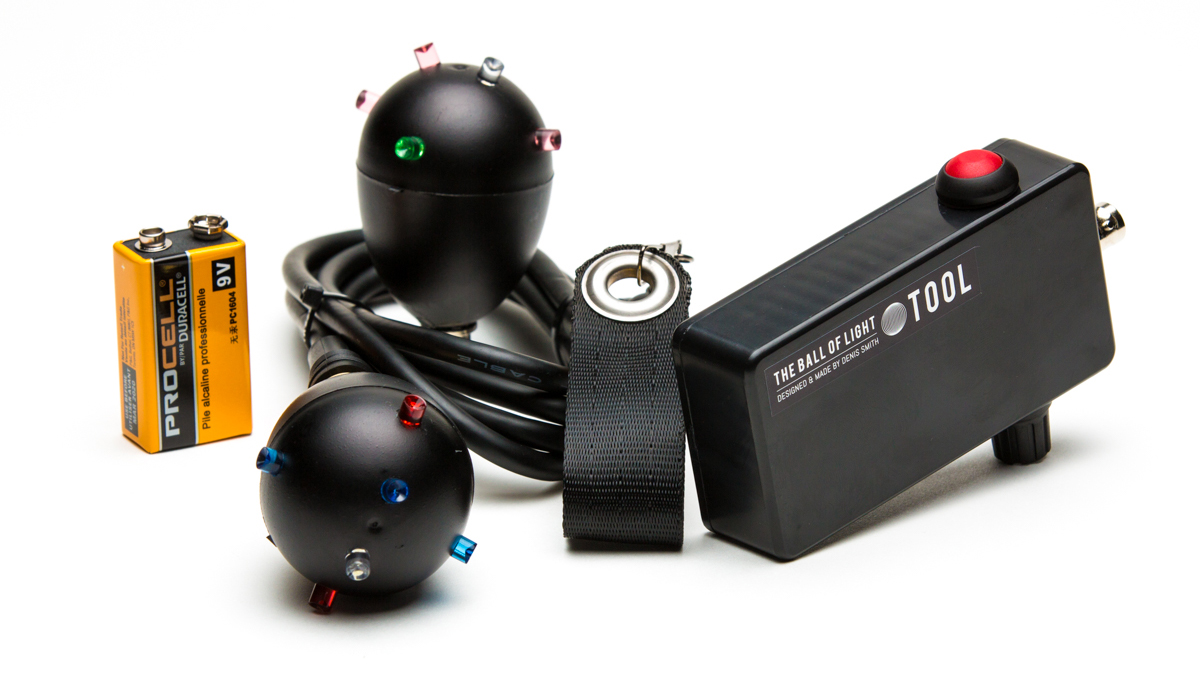
The Ball of Light Tool, by Denis Smith is an awesome invention and once mastered it produces some fantastic spun orbs.
Again though, any light emitting device will work well depending on how you decide to use it. You will just need to be aware of the power of the light, this is represented in Lumens (Lm) the higher the Lm number the brighter the light, if you are going to be in an area with more ambient, or background light you will want a high Lm producing light above 1200 Lm, but to start with you could get away with using a light producing as little as 400 Lm. A search of different lights and possible strobe features online will give you plenty of options at varying price points.
Ready-made tools: There is a fantastic array of light painting tools available for purchase from numerous companies, and whilst I don’t recommend one tool over any other, these tools or brushes have helped me produce some great results:
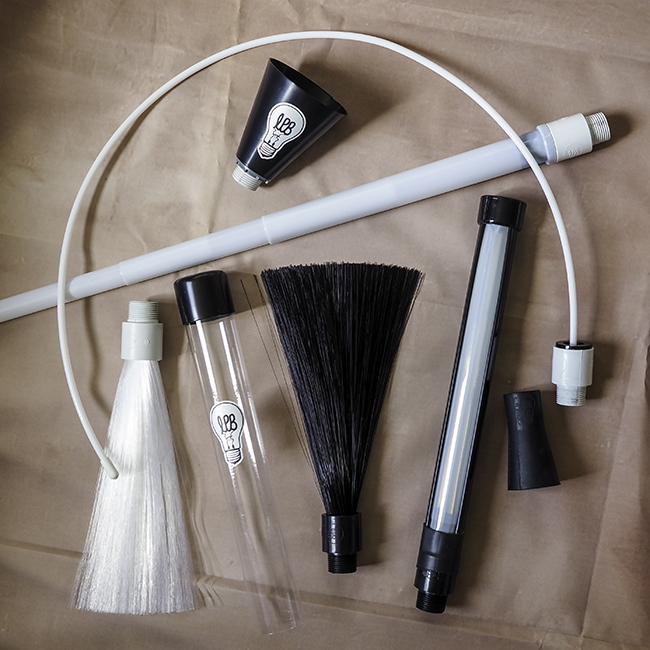
- Light painting brushes make a wide variety of tools from wonderfully shaped plexi glass / Perspex shapes can be fitted on the end of the flashlight using adaptors and coloured using gels, to fiber optic brushes – allow fire and pixie dust effects to be produced and can add real interest to portraits and glitter sticks which are very simple tubes purposely designed to produce wonderful textured patterns.
- Ants on a Melon has a fantastic range of quality tools that are well worth a look.
These purpose-built tools can be pricey, but for those of us that are time poor, the results can be awesome.
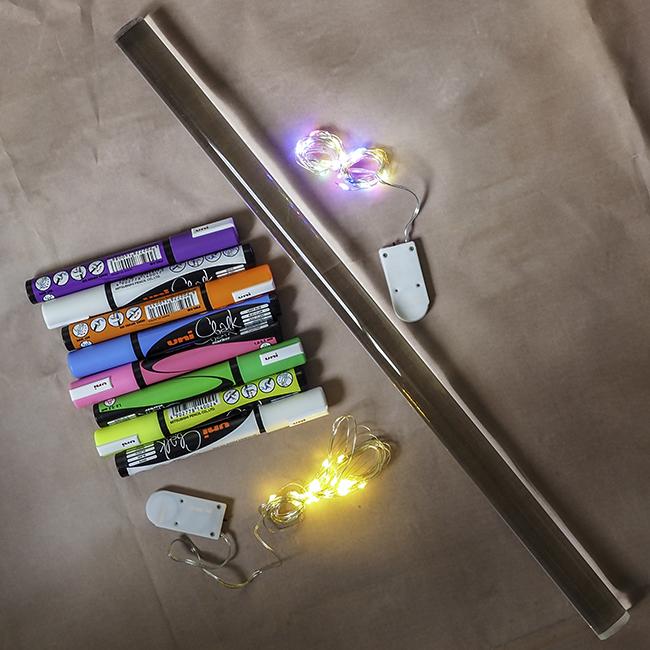
Homemade tools: Here is the real beauty of light painting! Anything you find around your home could be a potential light painting tool or brush, you can get really creative I have purchased some cheap led lights from eBay and turned them into a ball that can be spun on a string to produce great orbs of light, bicycle wheels with EL Wire can produce fantastic domes of light, a Perspex rod with a flashlight coloured by chalk pens can become a light Sabre like tool or crumpled tin foil and a flash light can produce awesome results, the process of searching for something to help you make an image will really help get the creative juices flowing and help you imagine all possibilities!
Again, the only limiting factor for what you can achieve is your imagination, you can create anything from abstract patterns and beautiful symmetrical orbs that seem to hover in space to some extremely creative light painted portraits and spirographs, the possibilities are truly endless.
For a great deal of light painting methods, it is important to have your camera locked off on a sturdy tripod to keep it still whilst you move the light in front of the lens to create your masterpiece, but this is not always necessary, some fantastic abstract result can be achieved by zooming in or out on zoom lens during the exposure too, or to get really inventive you could try to pull focus and then in a Live View Composite mode capture, refocus and add additional patterns or shapes to the focus pull image.
What to Wear?
Generally speaking with photography light erases dark so with that said, try to wear dark or black clothing and try to keep skin covered so as to avoid having the bright parts of your skin reflect the light back to the camera and thereby becoming visible in the final image, also I find if you try to keep moving in the frame the chances of you being seen in the final image is drastically reduced.
Camera Settings
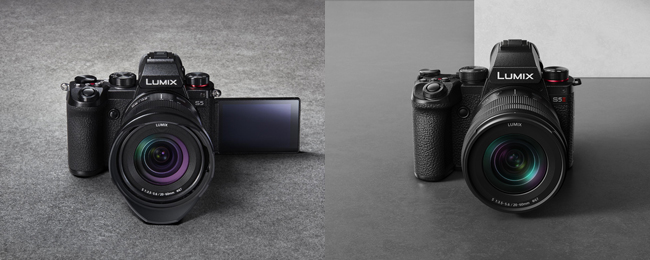
The tools I use for my light painting are most importantly my Panasonic LUMIX S5II camera (but any Panasonic Camera capable of long exposures can be used) and my L mount lenses, any of which would work, but my go to for most images is the 20-60mm Kit Lens, which I find offers excellent image quality and versatility due to the zoom range of the lens. I use the camera predominantly in Live View Composite mode as I find it keeps the vibrance and saturation of the colours in the scene without blowing them out, other modes like BULB mode can be used to good effect as well, I find in these modes it is easy to expose the image for a fraction too long and burn out the colours. I also find setting my exposure compensation to – 0.3 of a stop helps to retain more colour and vibrance in the final image.
I find using base ISO around 100 gives very clean low noise files and F8 seems to give adequate depth of field and in most cases allow enough light in through the aperture to show the light painting tool well without blowing out the colours, this will obviously require fine tuning dependent on the location that you choose and the strength of the light source you select as you brush.
One thing to keep in mind is that the length or duration of the exposure will control the overall brightness of your image, the ambient light, so a longer duration exposure will result in a brighter overall scene and the aperture of F stop controls the brightness of the light painting tool only so if your tool in too dull at F8 open the aperture up to F5.6 or F 4 and the tool will appear brighter, conversely if the tool is too bright at F8 close the aperture down to F11 to bring back more colour.
Locations
I really enjoy looking for locations that are interesting to start with and then try to imagine how that location could be improved with the addition of a light painted pattern, and for me the theory of less is more works well, it is easy to get carried away and overcomplicate the scene.
It really is about trying your concept and then working out the best mode or setup for you, in the location or situation at hand, but therein lies the fun and creativity. And when you see the ideas you had materialise into a fantastic photographic creation in camera, I challenge you not to smile and give a little fist pump!
So, my advice to you, the next time you are struggling for motivation, or maybe bored with your surroundings, or uninspired by the landscapes and areas you have access to! Give some thought to adding light painting into the mix, I guarantee that you will love it, it will get the creative juices flowing again and help you see possibilities and photographic opportunities where in places that you may have otherwise discounted!
Image examples
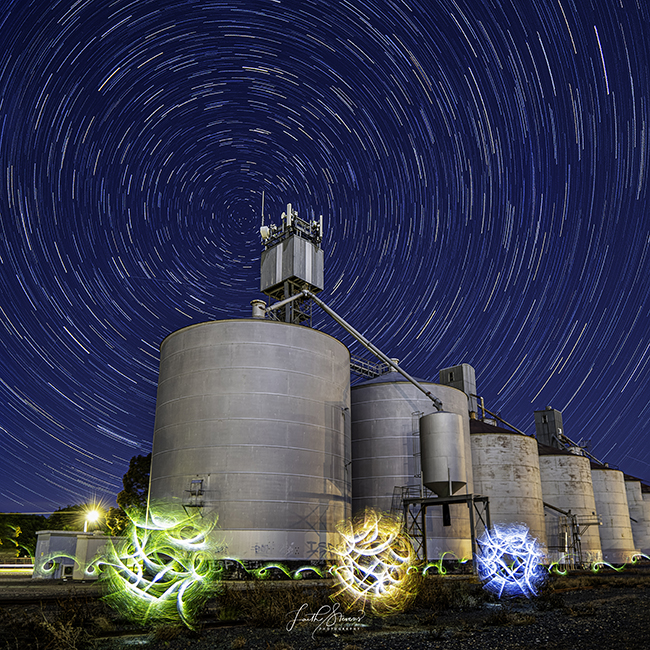
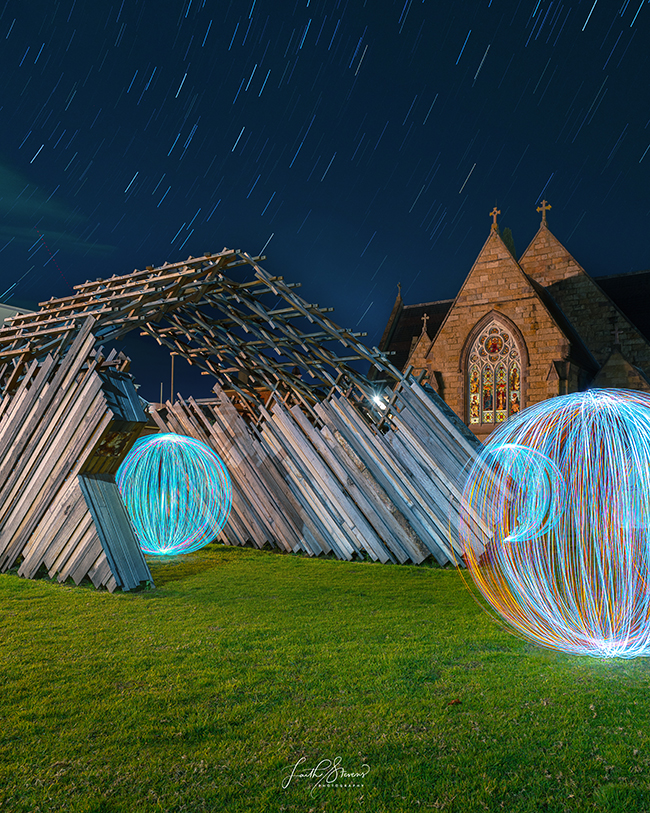
LUMIX S5 with LUMIX S 20-60mm Kit lens
20mm, F3.5, 20 Seconds Live View Composite 40 exposures ISO 320.
Image shows star trails and Orbs created with Light Painting Brushes Earth, Wind and Fire Glitter Stick Set.
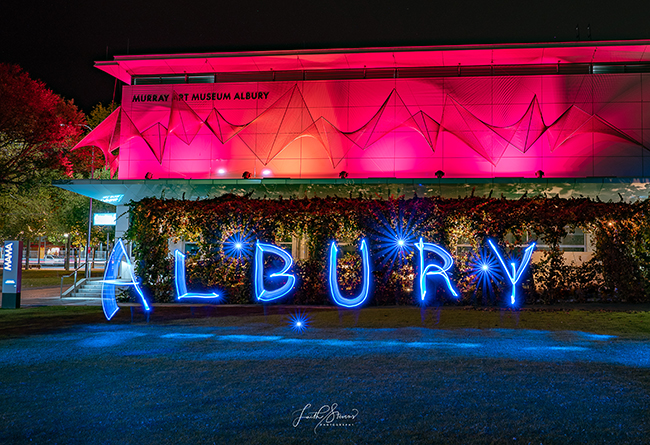
LUMIX S5 with LUMIX S 24-105mm F4
24mm, F14, 6 Seconds Live View Composite 25 exposures ISO 250.
Image shows written text and star points created with Light Painting Brushes Rectangular Plexi and the Lightpainter by Ryu’s Lightworks flashlight with a Blue Gel.

LUMIX S5II with LUMIX S 20-60mm Kit Lens
60mm, F8, 15 Seconds Live View Composite 25 exposures ISO 100.
Image shows a Red Orb created with Light Painting Brushes Unicorn Plexi and the Lightpainter by Ryu’s Lightworks flashlight with a Red and yellow Gel.
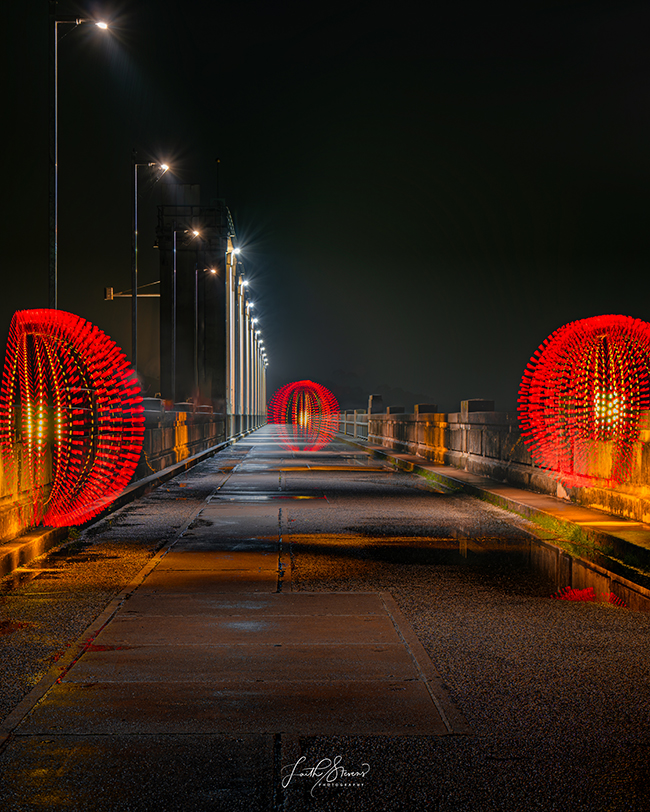
LUMIX S5II with LUMIX S 20-60mm Kit Lens
60mm, F8, 15 Seconds Live View Composite 50 exposures ISO 100.
Image shows 3 Red Orbs created with Light Painting Brushes Unicorn Plexi and the Lightpainter by Ryu’s Lightworks flashlight with a Red and yellow Gel.
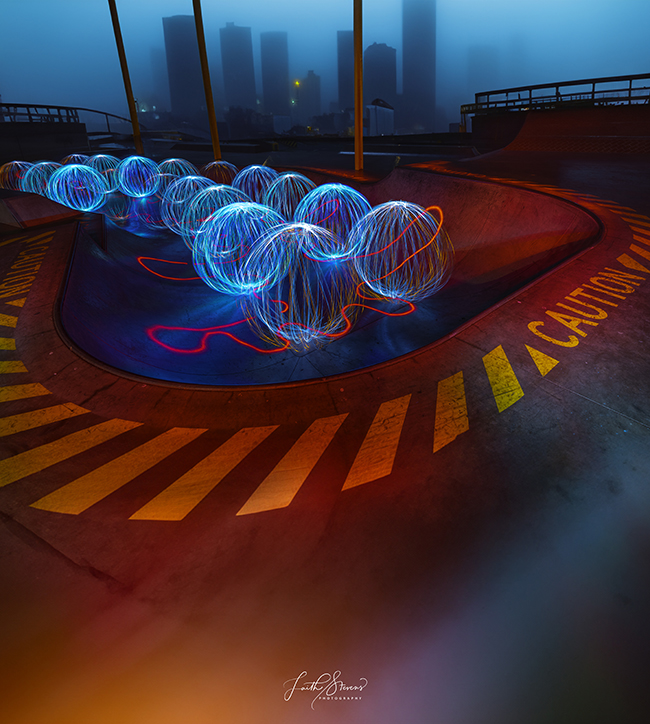
LUMIX S5II with LUMIX S 20-60mm Kit Lens
39mm, F8, 5 Seconds Live View Composite 75 exposures ISO 100.
Image shows multiple Balls of Light created with Ball of Light tool by Denis Smith 4 x different coloured heads used.
LUMIX S5II with Sigma 16-28mm F2.8 Lens
16mm, F7.1, 40 Seconds Live View Composite 125 exposures ISO 400.
Image shows 19 Balls of Light created with Ball of Light tool by Denis Smith 4 x different coloured heads used. And a red line made with the Lightpainter by Ryu’s Lightworks flashlight with a Red Gel.
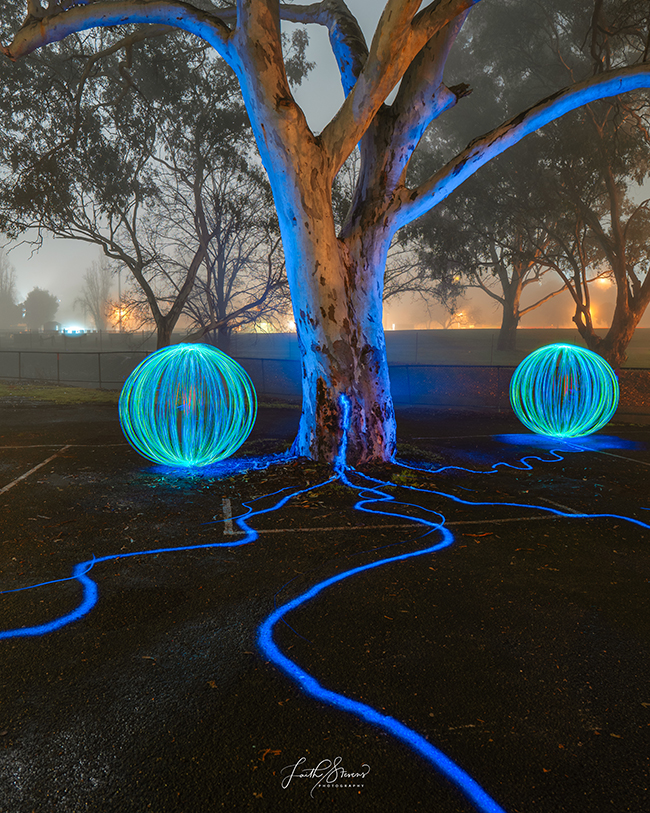
LUMIX S5II with Sigma 16-28mm F2.8 Lens
20mm, F5, 50 Seconds Live View Composite 19 exposures ISO 250.
Image shows 2 Balls of Light created with Ball of Light tool by Denis Smith. And a Blue line made with the Lightpainter by Ryu’s Lightworks flashlight with a Blue Gel.
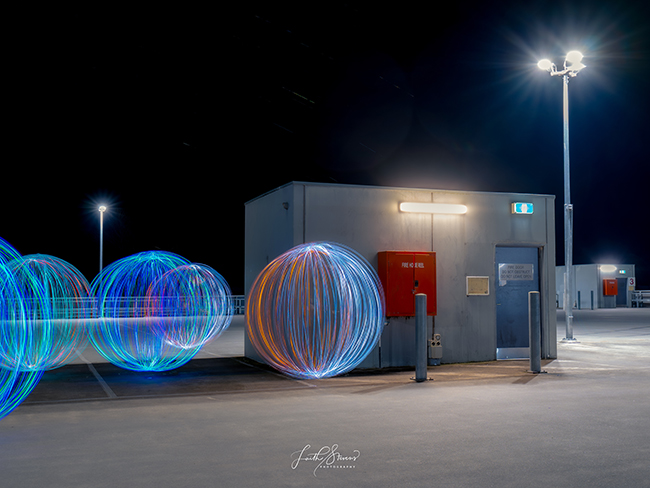
LUMIX S5II with LUMIX S 20-60mm Kit Lens
24mm, F8, 20 Seconds Live View Composite 75 exposures ISO 100.
Image shows 3 Balls of Light created with Ball of Light tool by Denis Smith. And star trails.
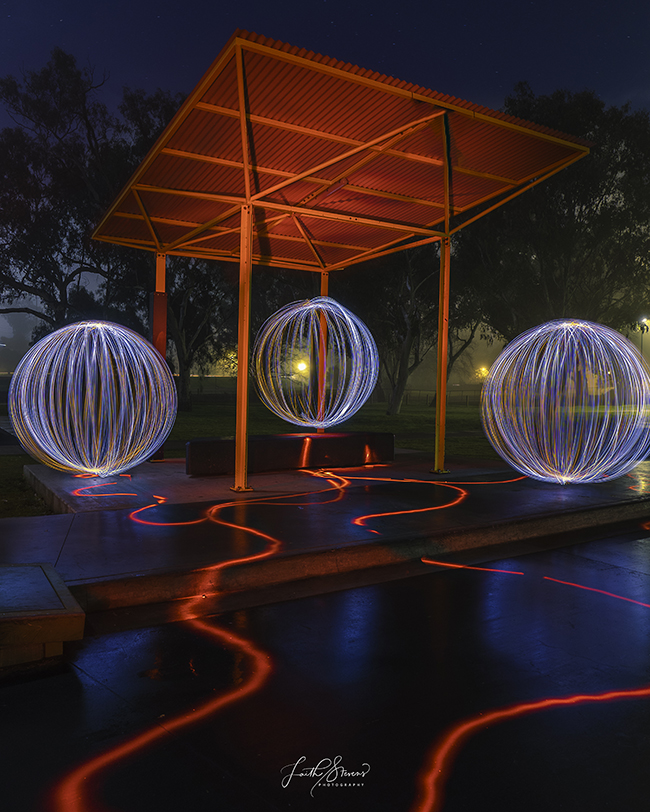
LUMIX S5II with Sigma 16-28mm F2.8 Lens
20mm, F8, 40 Seconds Live View Composite 65 exposures ISO 320.
Image shows 3 Balls of Light created with Ball of Light tool by Denis Smith. And a red line made with the Lightpainter by Ryu’s Lightworks flashlight with a Red Gel.
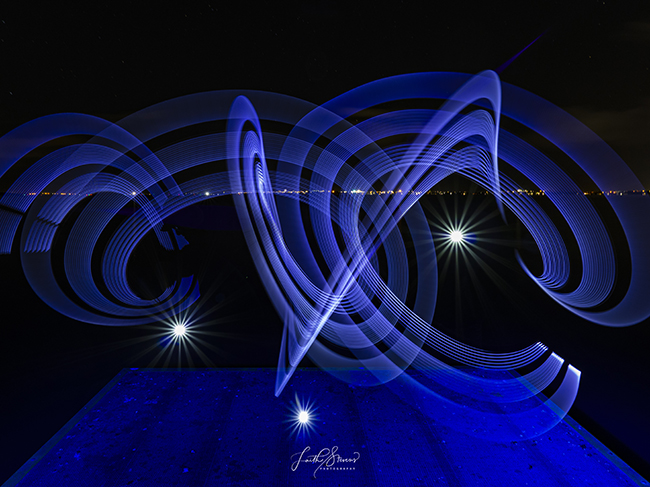
LUMIX S5II with LUMIX S 18mm F1.8 Lens
18mm, F8, 60 Seconds Live View Composite 3 exposures ISO 800.
I mage shows Freehand Light swoosh and star points using the Ants on a Melon Critter 2.0 RGB flashlight and the modular lumi sabres.

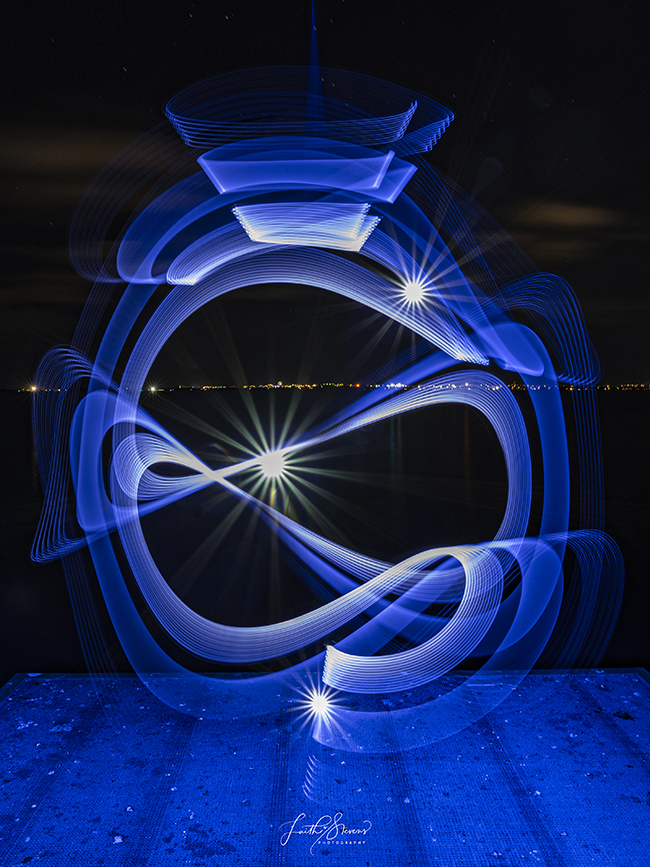
LUMIX S5II with LUMIX S 18mm F1.8 Lens
18mm, F8, 60 Seconds Live View Composite 3 exposures ISO 800.
I mage shows Freehand Light swoosh and star points using the Ants on a Melon Critter 2.0 RGB flashlight and the modular lumi sabres.
LUMIX S5II with LUMIX S 18mm F1.8 Lens
18mm, F8, 60 Seconds Live View Composite 3 exposures ISO 800.
Image shows Freehand Light swoosh and star points using the Ants on a Melon Critter 2.0 RGB flashlight and the modular lumi sabres.