Easter eggs have been appearing on the supermarket shelves since New Year and by now they have whole dedicated aisles but that doesn’t need to mean you have to take home the same foil-wrapped treat as everyone else.
Get the whole family together and make some treats that the Easter Bunny will envy with these glow-in-the-dark hen eggs and our tips for making your own tasty chocolate eggs – both using your trusty Panasonic microwave!
Make your eggs glow in the dark

Image and recipe by wikiHow
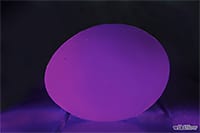
Take some ordinary hen eggs, egg dye and a microwave and you can make a fun Easter project for the whole family. The dye reacts with the protein in the eggs and the energy in the microwave to make one out of three glow in a super cool way. Now, these eggs will not be edible, they are just for fun decoration!
Method
- Place three raw eggs gently into a bowl with egg dye. Turn the eggs over a few times to make sure they are covered with dye, and then let them soak for 5 minutes.
- Take the eggs out of the bowl let them sit on a piece of paper towel until they dry.
- Place all of the eggs onto a microwave-safe plate or platter and then microwave on medium temp for 10 seconds only
- Carefully remove the eggs and place them on a table or any hard surface.
- Turn off the lights. You will see one or more eggs glowing in the dark. Interestingly, only one in three eggs will have this occur as the albumen (egg white) protein needs to be at a certain level. If it doesn’t work, try again with a new batch of eggs.
Make your own chocolate eggs

If you want to get everyone involved in making Easter eggs instead of buying them from the store, you’ll so much easier to use a microwave to melt cooking chocolate for the moulds than fussing around with double boilers on the stove.
Perfect melted chocolate
- Break the chocolate into evenly sized pieces.
- Place in a clean, dry, unchipped, heatproof, microwave-safe bowl (Pyrex is recommended). Do not use plastic bowls as they retain moisture that will cause chocolate to seize.
- Leave the chocolate uncovered, as covering it will cause condensation to form and drop into the chocolate, again causing it to seize.
- Microwave uncovered for the first minute on Medium-High/70%. Stir with a metal spoon. Then microwave for 30 seconds and stir again until smooth. You can microwave or a further 30 seconds if required, stirring afterwards.
- Remove from microwave and stir until completely smooth.
Tips for chocolate moulds
- Brush an Easter egg mould with vegetable oil to lightly grease.
- Spoon the melted chocolate into the prepared mould (about 1 1/2 tablespoons each side for a large mould and 2 teaspoons each side for a medium mould).
- Working quickly, use the back of a teaspoon to spread the chocolate evenly over the inside of both sides of the mould.
- Close the mould so the edges join. Use clips to secure.
- Shake to coat on both sides. Set aside for 5 minutes. Turn over and set aside until almost set.
- Place in fridge for 5-10 minutes to chill.
- Remove the clips. Gently press the top and bottom of the mould, one side at a time, to release the egg.
Then it’s time for the Easter egg hunt! Why not use your glow in the dark eggs to light the way around the back garden for a fun night hunt?
Easter treats are easy with a Panasonic microwave.

Fold glow sticks inside empty plastic Easter eggs for a night time glow in the dark egg hunt! Image by Pinterest.
