With the holidays around the corner, photo opportunities are bound to be plentiful. Whether you will be capturing glorious images from an exotic location or just snapping pics of the Easter egg hunt in your backyard, you want to take images that you will be proud to share with your family and social networks.
In a time when filters slapped over everything and the ubiquitous selfie rules supreme, some of the fundamentals that contribute to a good photograph have been lost. So we thought we would share a few tips from the professional photography community that will help make your photos more memorable. It never hurts to brush up on the basics!
Lock in your subject
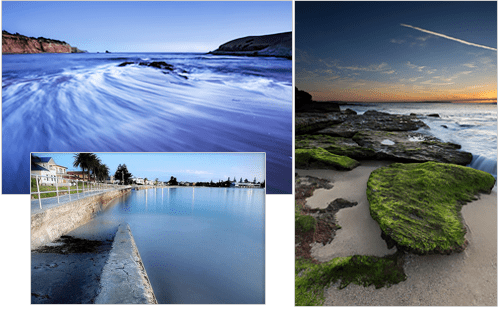
Images by Flickr. Clockwise from top left: Justin Kern, Gemma Stiles and Scott Maxworthy.
Right in front of you is a majestic forest, achingly beautiful sunset or a spectacular harbour with yachts bobbing in the sunshine. They are all lovely scenes but taken by themselves, they don’t really mean anything – especially as the temptation is to take as wide a shot as possible to cram everything into the frame. If you want to express some of the magic you feel from this kind of captivating scene, find something that stands out (a subject, in other words) and lock it in as your focus while the scene plays out in the background. Come in closer to the sails flapping on a yacht for instance and that harbour will seem all the more striking in contrast. Also remember: the viewer’s eye will actually look at the foreground first. If there is nothing there, you might lose them right at that point.
Experiment and have fun

Image by Flickr: Daniel Littlewood, Kids crowding in Prek Leap, Cambodia.
Rather than spending a long time trying to get everything aligned for that one perfect shot, loosen up keep pressing that shutter. For instance if you are snapping the kids playing in the backyard, let them go nuts and allow yourself to take about ten frames for one good shot. You can afford to experiment… after all this isn’t 1871 and you don’t have to have to change the plate each time you take a photograph. With high-capacity SD cards at your disposal, you should be experimenting as much as possible and letting yourself have some fun.
Look at things from a different angle
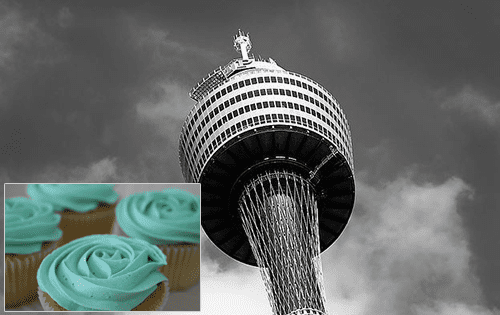
Images by Flickr: Sacha Fernandez (Sydney Tower) and Shining Star (cupcake).
Instead of treating your friends and family to the world according to your eye level in every picture you take, shake up your perspective. Whole new worlds of meaning can be imbued into an image by merely changing the angle from which it is viewed. Think about standing on a street corner and snapping a pic of Sydney Tower. It would just be one more ordinary shot of an extraordinary structure. Now imaging getting down on ground and shooting upwards to capture the soaring height of Sydney’s tallest building. Which do you think would portray the tower on a grand scale?
Let there be light

Image by Flickr: Chris.
An awareness of how to utilise light is second-nature to professional photographers because judging and adjusting the light is essential to their trade. You may never need to grasp all the complexities of light but you can certainly take a few cues from the pros to dramatically improve your shots. To begin with, the most flattering light occurs when the sun is low which makes early morning and late afternoon/evening a good time to get out the camera. You should also remember that cloudy days are better than sunny ones and if you do have to take a pic during the brightest part of the day, try and move your subject into the shade.
Right now you are probably only using your flash to take pictures when it’s dark, but you can be really tricky and use it to light your foreground subject when the background is already bright to take away shadows and create the perfect exposure.

Create a sense of scale by featuring person, animal or object to the foreground and you can communicate the grandiosity of a landscape or the small proportions of an object in any scene. Images by Flickr. Clockwise from top left: Amy Dianna, Alias Rex, Rob Brazier and Wendy Longo.
Don’t make the rookie mistakes
These are kind of the ‘duh’ tips because they should be common sense but you would be surprised how often they are neglected:
- Read the user manual properly instead of learning how to turn the camera on and running out to shoot pictures.
- Make sure the battery is charged and that you have a fully-charged spare on hand. It wouldn’t hurt to take the actual charger with you as well.
- Keep a good stock of SD cards with your camera – remember, you are going to be experimenting and you don’t want to run out of space.
- Once you’ve backed up all your images, format your memory card instead of deleting your pictures to minimise the risk of any data corruption.
- Set the image resolution. Sometimes a smaller image size is all you need. It also means more images will fit on a memory card and you can achieve a faster shooting rate.
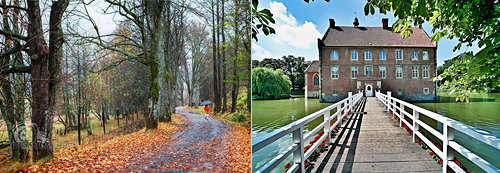
Lead with lines and curves because they are magnets for human eyes. You can give your subject more ‘view-power’ by placing it at the end of a road or fence. Images by Flickr. From left: Rudolf Vicek and Robert Muller.

Sometimes simple is best; go for a minimalist approach by highlighting just one small element, such as colour or a subject, and it will let your audience’s imagination run free. Images by flickr. From left: Dave Paterson and Astrid.